Crispy Garlic Butter Chicken Thighs the Whole Family Will Ask For Every Week
Now, let me tell you something about chicken thighs.
Now, let me tell you something about chicken thighs. A lot of folks overlook them — they reach right past that package at the Piggly Wiggly and grab the boneless, skinless breasts, thinking that’s the proper way to do things. Big Mama Pearl would have something to say about that. She cooked thighs her whole life because she knew what most people are just now figuring out: that’s where the flavor lives. The fat in that skin, the richness of the dark meat, the way it stays tender even if you leave it in the pan a minute too long — thighs are forgiving, and they’re delicious, and I will not hear a word against them.
This recipe came together on a Tuesday evening a few months back when Marcus Jr. dropped the twins and Baby Ruth off while he picked up an extra shift. I had thighs in the refrigerator, half a head of garlic on the counter, and a stick of butter looking at me from the dish. Jaylen was doing homework at the kitchen table. I said, “Baby, come stir this for me while I get the pan hot,” and forty minutes later we had the kind of dinner that makes everybody go quiet for a minute before the compliments start. Naomi — my Naomi, who has opinions about everything she eats — had seconds. That told me everything I needed to know.
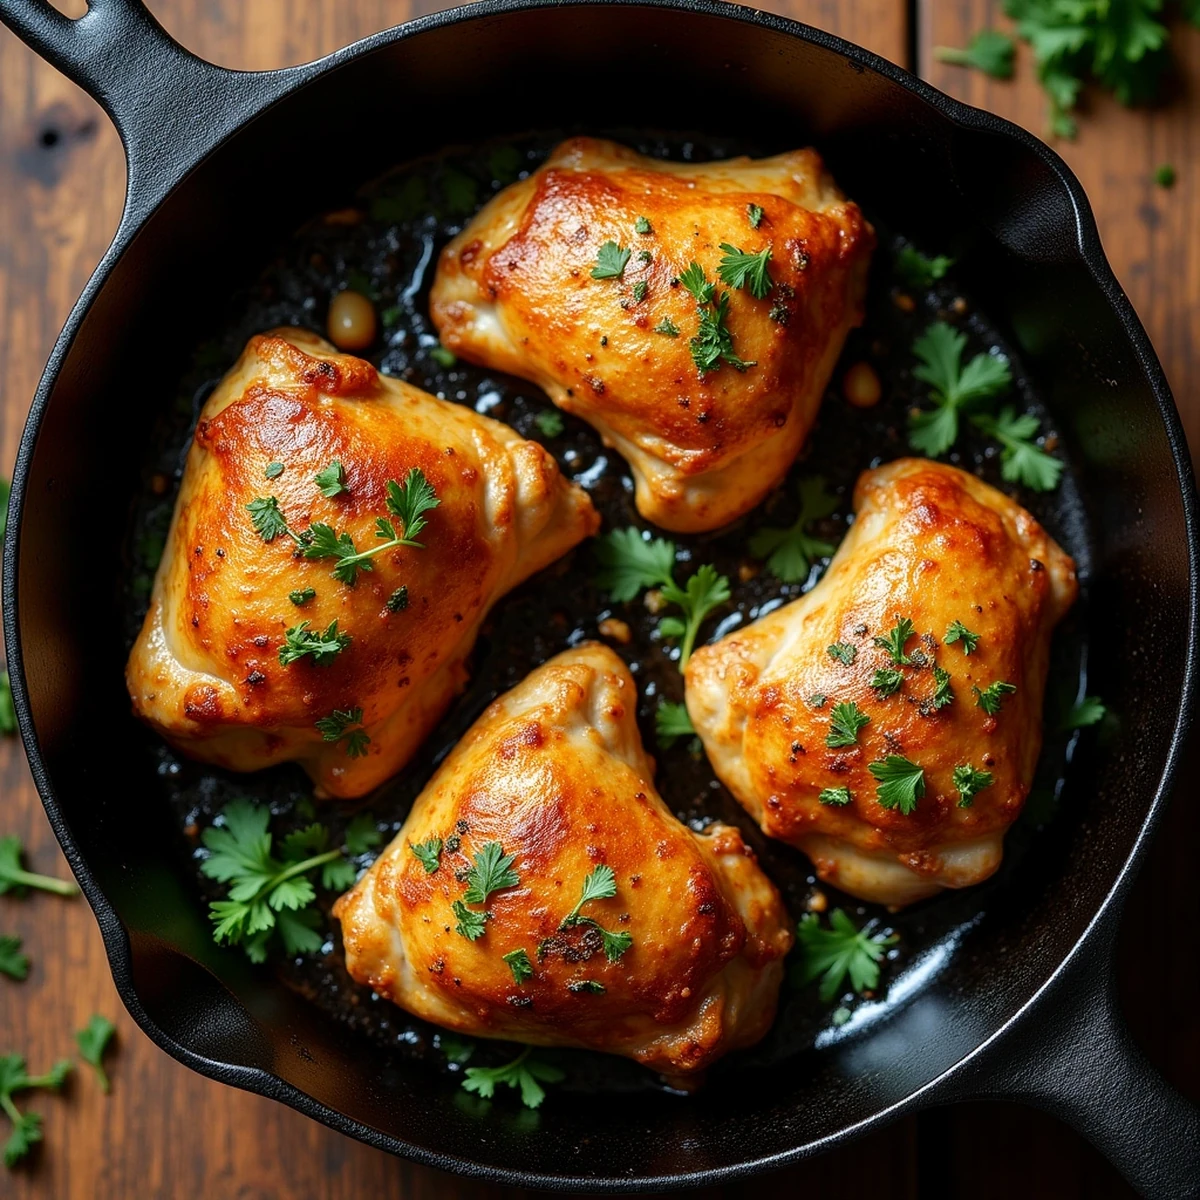
These crispy garlic butter chicken thighs are the kind of recipe that sounds fancier than it is. You sear those thighs skin-side down in a hot skillet until the skin turns deep golden and crackles when you press it, then you baste them with the most beautiful garlic butter you’ve ever smelled, finish them in the oven, and that’s it. One pan. About forty minutes start to finish. And I mean that from the bottom of my skillet — this is weeknight food that tastes like you spent all afternoon. Keep this one close. You’re going to need it.
Ingredients
- 4 bone-in, skin-on chicken thighs (about 2 to 2½ lbs total)
- 1 teaspoon kosher salt, plus more to taste
- ½ teaspoon black pepper
- ½ teaspoon garlic powder
- ½ teaspoon smoked paprika
- 4 tablespoons salted butter, divided
- 6 cloves garlic, minced (do not use the jar kind — not today)
- 1 tablespoon fresh thyme leaves, or ¾ teaspoon dried thyme
- 1 tablespoon fresh parsley, chopped, for finishing
- 1 teaspoon lemon juice (optional, but it brightens everything up)
Instructions
-
- Pull your chicken thighs out of the refrigerator about 15 minutes before you cook them. Cold chicken straight from the fridge hits a hot pan and seizes up — letting them come closer to room temperature gives you a more even cook and a better crust. While you wait, pat them completely dry with paper towels. I mean completely dry, sugar. Moisture is the enemy of crispy skin. Season them all over — top, bottom, and sides — with the salt, pepper, garlic powder, and smoked paprika. Press the seasoning in gently with your hand.
-
- Preheat your oven to 400°F. Place your oven rack in the middle position. While the oven heats, set your largest oven-safe skillet — cast iron if you have it, and I hope you have it — over medium-high heat on the stove. Let it get good and hot before anything goes in. You’ll know it’s ready when you hold your hand a few inches above the pan and feel real, steady heat rising up to meet you.
-
- Add 1 tablespoon of the butter to the hot skillet and swirl it to coat. The moment it stops foaming, lay your chicken thighs in skin-side down. Do not crowd them — if your skillet isn’t big enough, work in batches. You should hear a strong, confident sizzle the second they hit that pan. Resist every urge to move them. Let them sear undisturbed for 8 to 10 minutes, until the skin is deep golden brown and releases easily from the pan. (Jaylen learned patience at this step. It took a few tries, but he learned.) Flip the thighs and cook the other side for 3 minutes.
-
- While the chicken sears, prepare your garlic butter. In a small saucepan or in a corner of the same skillet if you have room, melt the remaining 3 tablespoons of butter over low heat. Add the minced garlic and the thyme. Let it cook gently — barely a simmer — for 1 to 2 minutes until the garlic softens and the whole kitchen starts to smell like something worth staying home for. Don’t let the garlic brown. We want it sweet and fragrant, not bitter.
-
- Spoon the garlic butter generously over the chicken thighs, getting it into every corner of the pan. Tilt the skillet slightly and use a large spoon to baste the chicken again and again with the butter pooling at the edge. Then slide the whole skillet into your preheated 400°F oven.
-
- Roast for 18 to 22 minutes, until the internal temperature reads 165°F on your meat thermometer and the skin is deeply golden and crackling. If you don’t have a thermometer, cut into the thickest part near the bone — the juices should run clear and the meat should no longer be pink. Halfway through the oven time, open the door and baste the chicken once more with the pan drippings. That extra step is the difference between good and ‘call me for the recipe’ good.
-
- Remove the skillet from the oven — use your heaviest oven mitts, and warn anybody nearby that the handle is extremely hot. Let the chicken rest in the pan for 5 minutes. This is not optional. Resting lets the juices settle back into the meat, and if you cut into it right away, all that good flavor runs out onto the pan instead of staying where it belongs. Squeeze the lemon juice over the top if you’re using it, scatter the fresh parsley over everything, and serve straight from the skillet.
Nutrition
Tips
Grandma’s Notes:
1. Dry skin is everything. I said it in the instructions and I’m saying it again here because this step is the whole game. If your chicken skin is wet when it hits the pan, it will steam instead of sear, and you’ll end up with soft, pale skin instead of that gorgeous crackle. Pat those thighs dry like you mean it. I keep a stack of paper towels right by the sink for exactly this reason. Big Mama Pearl never had paper towels — she used a clean dish cloth — but the principle is the same: dry meat browns, wet meat doesn’t.
2. Don’t touch it while it sears. I know it’s tempting to peek, to nudge, to check on it. Leave it alone. The skin will stick to the pan at first and then release on its own when it’s ready. If you try to move it before that happens, the skin tears and all your hard work goes with it. When it lifts easily, it’s ready to flip. You’ll know it when you see it.
3. Little hands can do more than you think. Jaylen handles the garlic for me now — he minces it himself with a proper knife, but when he was nine, he used a garlic press and felt just as proud. Caleb can pat the chicken dry and sprinkle the seasoning with supervision. Even Baby Ruth has a job: she stirs the parsley into a little bowl and ‘prepares’ the garnish, which mostly means she tastes the parsley and makes a face. Every job matters. Every child in that kitchen is learning something that will stay with them long after this dinner is gone.